
In today’s digital age, laptops have become an indispensable part of our lives. However, as powerful as they are, they often come with the downside of overheating, which can hamper performance and reduce lifespan. One simple and cost-effective solution to this problem is a laptop cooling pad. In this guide, we will walk you through the steps to create your very own laptop cooling pad using easily available materials.
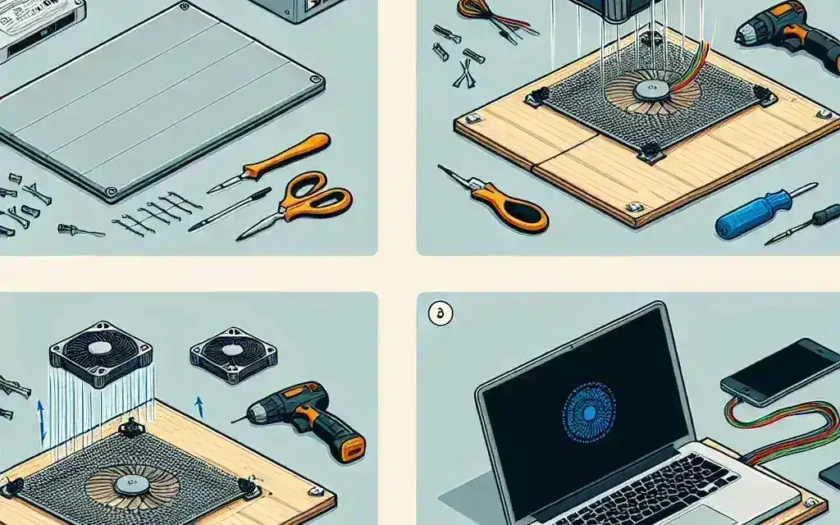
Materials You Will Need
Before diving into the process, let’s gather the necessary materials for crafting your laptop cooling pad:
- Plastic or metal tray
- Cooling fans (USB powered)
- Drill
- Screws
- Screwdriver
- Mesh or perforated metal sheet
- Glue gun
- USB extension cable (optional)
Step-by-Step Instructions
Follow these steps to assemble your DIY laptop cooling pad:
1. Choose the Base
Select a suitable base for your cooling pad. A plastic or metal tray works well because they provide good thermal conductivity and are easy to drill into. Ensure the tray is large enough to support the size of your laptop.
2. Prepare the Cooling Fans
Purchase USB-powered cooling fans that can be easily integrated into your project. Most electronics stores or online marketplaces will have a variety of options. You will need at least two fans for optimal airflow, but you can add more if necessary.
3. Drill Holes for Ventilation
Use a drill to create ventilation holes in your tray. These holes will allow for airflow and help dissipate heat. Space them evenly across the tray, focusing on the areas directly under where your laptop will sit.
4. Mount the Fans
Position the cooling fans over the ventilation holes you created. Use screws to secure the fans in place. Make sure they are oriented to push air towards the bottom of the laptop. If your fans come with a grill or guard, attach them for added safety.
Fan Orientation and Placement
| Number of Fans | Placement | Orientation |
|---|---|---|
| 2 | Opposite sides | Blowing upwards |
| 3 | Three corners | Blowing upwards |
| 4 | Four corners | Blowing upwards |
5. Secure the Mesh
Cut a piece of mesh or perforated metal sheet to the size of your tray. This will act as the surface where your laptop will rest and ensure that it gets ample airflow. Use a glue gun to attach the mesh to the tray, ensuring it is firmly in place and does not wobble.
6. Test the Setup
Connect the cooling fans to a USB power source to ensure they are working correctly. Place your laptop on the cooling pad and check if the fans are effectively reducing the temperature of your laptop. If necessary, make adjustments to the fan placement or increase the number of fans for better performance.
Optional Enhancements
If you want to take your DIY cooling pad to the next level, consider these optional enhancements:
- Adjustable Stand: Add adjustable stands to your cooling pad to provide better ergonomics. This will enable you to angle your laptop screen for a more comfortable viewing experience.
- LED Lights: Integrate LED lights for a more aesthetically pleasing and professional look.
- USB Hub: Incorporate a USB hub into the design to increase the number of available ports for your laptop.
Conclusion
Making your own laptop cooling pad is a simple, rewarding project that can significantly enhance the performance of your laptop. By following these steps and using readily available materials, you can create a customized cooling solution that keeps your laptop running smoothly and prolongs its lifespan. Not only will you save money, but you’ll also enjoy the satisfaction of a DIY project well done.